Thursday, April 30, 2009

My Fabric Stash


This morning I have been inspired by pictures of a beautiful linen closet on I Heart Linen. That picture literally makes me want to cry.

Fabric has been a part of my life growing up; in fact, my grandmother's fabric shelves lined an entire wall, and as a 4-year-old, I would walk through and pick out my favorites just to look. I called it "shopping."

I guess I knew, even then, the beauty of a freshly cut piece of fabric. The endless possibilities encompassed in a mere half-yard of floral print. Fabric, as much a cupcakes and reality TV, is my guilty pleasure.

So I hope these pictures of my small, but growing stash inspire you to make something great. I'm still pondering the perfect use for each piece, but I know I'll find it!

And for an even more mouth-watering stash, check out I Heart Linen.

The Crafty Little Cupcake recommends: A Is for Apron


I found the best book at the library yesterday, and I've already added it to the reading list. "A is for Apron" gives directions and patterns for 25 different aprons, all cute, but what I love more is that the patterns and designs are easily personalize-able. The book even has a couple pages of vintage aprons that have inspired me!!!

My next big project for the summer, to come up with a cute craft apron... and one for cooking, and one for painting, and one for baking. You get the idea!

Wednesday, April 29, 2009

The Crafty Little Cupcake recommends: Made by Rae

Made by Rae is the sweetest sewing blog ever. And lucky, lucky, this week is Spring Top Week. She is posting a top design and pattern each day this week, and so far, they have all been super adorable. I'm not sure that my sewing skills are up to some of them, but I am definitely aiming to try! So my recommendation? Check out Made by Rae.

Let me know...

I frequently find that there are many things that I do not know how to do. I end up getting creative and finding some sort of solution, but that is really the hard part. I often need advice from a friend I don't have.

I want to be that friend for you.

If there is anything that any of you have a question about, want to learn how to do, or are confused about, please drop me a comment and let me know. If I don't know a solution, I will research and experiment until I can give you the best answer possible. And that's a promise!!

Monday, April 27, 2009

4-Ingredient Peanut-Butter Chocolate Chip Cookies

I'd like to post for you my favorite chocolate chip cookie recipe. It's my go to recipe for when I need to bake, but I don't have a lot of time. (My other go-to-cookie is sugar cookie for when I'm feeling sassy and creative and have a LOT of time).

My sister and I have been trying out different versions of this recipes for a while, because we always forget the amounts!

The cookies are not peanut-allergy friendly, but for those of you who have a gluten allergy, like a friend of my sister, these cookies are great! And those of us who aren't on gluten-free can enjoy them too!

Ingredients:

  • 1 egg

  • 3/4 cup peanut butter

  • 3/4 cup sugar

  • about 3/4 cup chocolate chips

Directions:
  1. Preheat the oven to 350.

  2. Mix together the peanut butter and sugar, then fold in the egg. Mix well.

  3. Fold in chocolate chips.

  4. Drop in 1-in balls on an ungreased cookie sheet, about 2 inches apart. They will spread.

  5. Bake for 12-15 minutes, or a little longer if you like your cookies crunchy.

Like I said, quick and easy. And delicious, especially hot.

Saturday, April 25, 2009

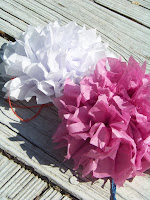
Paper Pom-Poms


Don't you just love that alliteration! I've seen these cute, cute pom-pom kits at Wal-Mart many a time, but why would I pay for that?? Tissue paper and string? Come-on!

So, when I found the directions on Martha Stewart's Web site (oh, that tricky, tricky lady), I was thrilled.

What she doesn't tell you, however, it that four sheets only make half a pom, which is good if you want to put it on something flat or use it as a napkin ring. But, if you want to make a garland or hang them from the ceiling, you'll need to make two and tape them together.

It would make sense to pull two sheets one way and two the other, but that doesn't give much "pom". But using eight sheets might cause rippage, so just make two and tape them!


How-to:
  1. To make a small pom-pom, cut a sheet of tissue paper into four ten-by-five sheets.
  2. .
  3. Stack the sheets, and fold into a 1/2 inch accordion fold.

  4. Tie the paper in the middle using floral wire or just string.

  5. Gently unfold into two fans and then pull the layers gently toward a center point on one side. Make sure to leave the bottom layer flat. You will only have half a pom.

For more, or to get dimensions for a larger pom-pom, visit Martha Stewart's Web site.

Friday, April 24, 2009

Magpies in Knoxville offering ShakesCakes


Local favorite bakery Magpies is currently combining two of my favorite things for a very special day, cupcakes and Shakespeare!

To celebrate Shakespeare's birthday, which fell sometime in the spring (No one really knows, but he was baptized April 26), Magpies is offering ShakesCakes! All the proceeds from the treats go to benefit the Knox County Public Library-another of my favorites...

Cupcakes and Shakespeare... What could be better?? Check them out at Magpies Web site.

Fabric Sale and Fabric Woes

I am generally always disappointed with Joann's. Everything is either expensive and not even exactly what I want or cheap and not what I want. But Wednesday, I lucked out.

I spent $20 dollars that I really shouldn't have spent, but I fond some pretty green felt (something I could not find at the other craft store), and really cute retro-ish print fat quarters.

I also got a few cuts of fabric, but I was disappointed in the selection of reprinted vintage designs, which you can find at a lot of quilting stores. So, I guess I am going to have to give my sad directional skills a challenge and try to find Mammaw's Thimble... Wish me luck!

And yes... I kid not. That is the name.

Thursday, April 23, 2009

Going to the Polls...

Hey guys!! I hadn't realized that I didn't really leave you a place to comment from my poll! But here it is! I want some feedback from everyone on this new blog, if it is better than the last, and what can be improved! If you haven't checked it out, the poll is just to the right... Please let me know how you feel! Thanks for you support and readership.

Tuesday, April 21, 2009

Failure clips and successful gift... boxes

I decided to make a friend some hair clips. I wanted to whip out my embroidery skills, but they were much more rusty than I thought. But I persevered. I embroidered the clips with paisley designs, but it was such a small space that it did not turn out the way I wanted.

So I tried to redeem myself with a cute gift box made out of paper... and I think I did an okay job!

I've never been good at sort of origami crafts, but my mother and I used to make these small boxes out of greeting cards.

For these boxes, I just used scrap booking paper, but I think a heavier craft stock would be better. These boxes are cute for small gifts, and I tied this one with embroidery floss. You could also attach a loop at one corner and use this as a cute ornament! A garland of them would be cute for birthday parties or make many in different colors for your Christmas tree.

The instructions were in Martha Stewart's Encyclopedia of Crafts, which I highly recommend! You can also find the directions at Martha Stewart Living.


(I apologize for the pictures. The lighting in my kitchen isn't great!)

Sunday, April 19, 2009

Felt Flower Headband

I am so in love with this headband. I have no idea where I am going to wear it- I don't own all that much red- but it is beautiful and it was easy to make!

  • Cut a pattern of the flowers from paper and cut four of each color from felt, strengthened with iron-on interfacing.

  • The bow is just two strips of felt. Lay one flat and sew the other on top with the ends tucked under.

  • Then just sew the flowers on top with small x's.

  • To attach it to the hairband, sew a small square of felt to the back, leaving enough room to slide the headband through. This allows you to wear the headband without the flowers or switch out different ones.


This headband is lovely, quick and interchangeable! You can make as many as you need and switch up looks to suit your mood or your outfit.


Friday, April 17, 2009

Vintage flower pin necklace

Hello... My name is Emily. I am addicted to Etsy. There are just so many good ideas there.

On my first trip to Esty, so long ago, I saw this vintage rose cabochon necklace for $34, which is not too bad a price, but I thought, why couldn't I make that?

So, I did. I found this vintage pin that my grandmother had given me. Part of the pin had broken off the back, so I clipped off the rest of the closure and glued on bails on either side.

I made the chain with green faceted beads. It has 10 beads on one side of the pin and 15 on the other, so the flower is skewed to the left, just to be quirky.

Now I have a cute new necklace, just because I thought, why not?


Thursday, April 16, 2009

The Crafty Little Cupcake recommends: Bakerella

I have literally just found the cutest,niftiest blog ever! It is full of tiny-cupcake-lollipop-treats. Sound interesting?? It is! You have to see it to believe it! Check it out at Bakerella!

Tuesday, April 14, 2009

Blue Birds of Happiness hair clips

These tiny blue birds of happiness won't poop in your hair or on your car (like some other birds I know).

I made these adorable clips for a friend of mine, but they are so easy, I thought I'd share it with you. Of course, you can use any cute woodland creature or anything else that you want!

  • These clips are very easy to make. All you have to do is trace the clip on piece of paper and add about a 1/4 of an inch on all sides.

  • Cut each pattern out of a doubled piece of felt, making two, and cut the second one across about 3/4 of an inch down from the wide end.

  • Sew your bird, then wing, to the top piece (here I used embroidery thread). I also ironed fusible interfacing to both pieces of the bird to stabilize the smaller, delicate parts.

  • Then sew the backs and front together, including everything but the back of the clip.


These clips are easy to personalize and inexpensive to make. Embroider your initials or a funky design to the top, as well as using felt pieces. There are literally endless ideas for these cute hair pieces.


Monday, April 13, 2009

Check out Craftynest!!

Okay... Craftynest is now my favorite blog! I want to make pretty much everything on there. I wish it would just transfer from the screen into my room. I would have no where to put it, but that part wouldn't matter! As soon as things slow down, and I have time, I am going to go trolling around antique markets trying to find a glass plate and vase to make a cake stand. Kudos to Craftynest!


Saturday, April 11, 2009

April showers bring pretty, wearable flowers!

Praise be to Martha for her great wisdom and cute, cute crafting ideas. I got this idea from an issue of Martha Stewart Living, although she used eyelet lace to make a huge rose. And don't discount Martha because she might be middle-aged and frumpy... Anything can be made to fit any style.

To personalize mine, I used fringed strips of vintage-inspired fabric, to make smaller, more colorful flowers. It's amazing what five minutes of boredom can do...

  • I basted the edge of the fabric, about a half inch from the edge, and pulled one end to create a ruffle, and twisted it around the center.

  • I sewed the layers together with some stitches in a star (*) shape, making sure to connect each layer. It really does not have to be pretty on the bottom! No one sees it. Just make sure everything is secure.

  • I just attached a colorful vintage button to the top and a pin to the back (and truth be told, I just pin mine on with a safety pin, but you can be fancy if you want), and voila!!


Other good ideas are lace, ribbon and any kind of fabric that you want for the flowers! And change up the centers with beads or sequins instead of buttons.

You can use smaller strips, both shorter and thinner, to make smaller flowers and vary the sizes. And three together looks even cuter!!


Thursday, April 9, 2009

A little bit about me...

I'm starting this blog to learn. For you to learn and for me to learn from you. This blog is being christened to talk about crafts -beading, knitting, baking- whatever comes to mind.

I hope you will ask me questions, and that I can pose questions here in return to learn from you. I love crafts and baking, but I still have a lot to learn.

I want to prove that the modern woman can be cool and crafty at the same time.

This is new to me, so bear with me dear readers. This might take a little while to start up, but I'm hoping you will like what I do here.

Photobucket