Showing posts with label craft. Show all posts

Wednesday, June 2, 2010

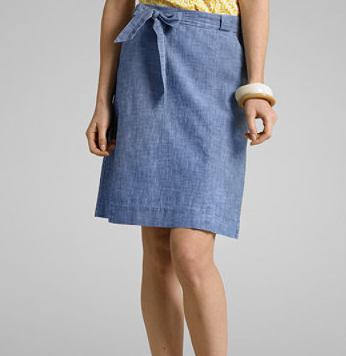
{skirt No. 2}

I sat down on Memorial Day, and I finally made it.

I've been planning to and dreaming about recreating this L.L. Bean Signature Collection skirt since I saw it in their summer catalog a few weeks ago.

In between the family visit, burgers and homemade ice cream, I slowly pieced together and hemmed the fabric. And in a second wind around 10 p.m., I put in the zipper and pieced together the tie belt from the pieces left.

I used a linen blend-- hence the wrinkles; I didn't bother ironing-- instead of chambray. I also nixed the belt loops and made the waist band and belt wider

I used the "Bias Skirt" pattern from One-Yard Wonders, which I could not love more, with same waistband technique that I used last time. However, to be fair, this project did take almost an entire yard and a quarter, as well as a zipper that the pattern did not include.

I wore the skirt to work and then to a party yesterday, and I loved it. It held up beautifully, and I felt proud to have made this!

Tuesday, May 18, 2010

{East Nashville Arts Fest}


I found out a little too late for entry to this, but I'm super excited for the East Nashville Arts Fest this weekend!!

This is the first fest, and I'm praying it continues as an annual event. I'm definitely hoping I can get my act together and sign up for next year. The entry fee is a little high, but it could be worth it. I'll have to see how this year's turn out is.

I've been more than busy with work, but hopefully I can keep crafting and keep posting! I wanted to share this, so that any readers in the Nashville area could go out and support the local crafting scene!

P.S.The amazing poster is from Yee-Haw Industries, hailing from my hometown, Knoxville, TN!

Thursday, May 13, 2010

{rosette pin tutorial--as promised!}


Buried in a drawer-- that's where I found the battery charger. In fact, the same, exact drawer in which I keep my camera!! Don't I feel just DUMB.

So finally, here is the tutorial-- a bit too late for Mother's Day, but perhaps it can go to good use another special occasion?

So, what you need for this project is:

  • a few rosettes in your-- or their-- favorite colors, you can use this tutorial
  • needle and thread
  • an extra strip of felt
  • a pin back
  • beads-- or buttons or anything else you like-- for the centers

1. Sew the rosettes to the extra piece of felt. To sew without the thread showing, just insert the threads in between the ruffles. It's also cute to let them show, especially if you use a contrasting color or one that matches your beads/buttons.

I like to overlap and curve mine, but they're also adorable to stack, and be sure to play around before you sew!

2. Cut the backing felt so that it doesn't show from the front. There's no need to finish the edges, but if you're especially hard on your jewelry, you might want to invest in a little fray check.

3. Use the same method used to attach the rosettes to add the beads (or just sew on the button).

4. Attach the pin back to the backing felt, and voila! Easy peasy. I went through each of the holes several times to make it super secure and then tied the ends behind the pin back. It's easy to miss the felt, so make sure you're getting the felt in your stitches each time. I would also suggest gluing down the thread tails to avoid them sticking out.

This is one easy project with beautiful end results. I spend about an hour total on each, so one TV program, and I'm done! I hope all of you will enjoy these as much as I have!

Wednesday, May 5, 2010

{mother's day surprise}


Well... it's more just like a card and a present rolled into one! But I think all my mothers and grandmothers are going to love one.

I suppose the postage would be a bit more on this than a regular card-- I'm handing them out to my family-- but aren't our mothers worth it?

I designed the card fronts specifically for this purpose, to put a pin next to it. Then I made another version for sending without the pin.

Hopefully, my mother's will wear the pins with pride-- and sorry for ruining your surprise-- or at least enjoy looking at the lovely cards!

** I'm putting the card fronts below. I hoping they are large enough and of good enough quality for you guys to use. I recommend printing them two to a page that is printed landscape.

Feel free to print them out and send them for personal use, but not for personal gain! Also, link love is greatly appreciated!**

card for pin

card without pin

P.S. Watch for a tutorial coming soon!

Monday, May 3, 2010

{pretties}

Finished!! I've been tinkering with idea in my brain for literally months, and I finally got around to doing it. Not that it was hard to do (I'm sure you'll figure out what I've done in nanoseconds), I just needed the time.

I guess you could say I'm pretty into pieces that are multifunctional, and this one fits that rule. It's both a brooch and a necklace!

The chain is detachable, so that it can be worn as a brooch. And of course, I'm able to switch out different brooches so that I can switch up the colors.

I'm already thinking of other applications for this chain. Maybe some ribbon or fabric?

P.S. Also, I was trying to model the necklace, but in every picture I ended up looking giraffe-y; so I've done the best I could with the most normal, non-giraffe-y photo.

Monday, April 19, 2010

{yesterday}

Yesterday was disappointing for many reasons. Something that I had thought was a "sure thing," didn't come through, and it threw me back into stress that I had thought I was finally breaking free of.

Of course, my natural coping method was to window shop, of sorts. So, I looked around to all my favorite bloggers-- and other places-- for inspiration.

  • Clutter is cool again on paper n stitch, which I wish meant I didn't have to clean my various sewing instruments off the dining room table
  • I wanna learn the essential life skill of toilet paper folding from How About Orange...
  • This place mat clutch tutorial might be the perfect compromise with Mr. Cupcake on my getting a new bag
  • Wallpaper inspired cookies are almost too beautiful to eat, but look delicious anyway
  • Urban Outfitters adorable cupcake set-- pictured above-- is so beautiful that something similar might be my next project... whose birthday is soon?

Thursday, April 15, 2010

{breezy}

Okay... Not the most flattering picture, but the skirt is so comfy! I made this easy, jersey skirt in under an hour the other day.

I had just gotten One Yard Wonders after failing to make a jersey skirt without a pattern. I suddenly wished I had had the book just a day earlier, because it would have saved a lot of math and seam ripping.

The skirt pattern and instructions are really simple and straight-forward. I also used a trick that I learned from my mother to make the waistband, without a seam showing!

It goes a little like this:

  1. Cut two waistband pieces the same length as the width of your skirt and double the measurement you want the waistband to be finished.
  2. Fold the waistband piece in half lengthwise with right sides together. Tuck one of the pieces of your skirt in between the edges of the waistband. Line the edges of the waistband with the top edge of the skirt. Pin.
  3. Sew.
  4. Pull the skirt piece out of the little roll, and this will automatically turn the waistband right side out-- like magic!
  5. Do the same to the other piece, then sew both sides of the skirt together!

*If that didn't make much sense to you, this tutorial might be helpful!

I'm already planning two improvements to this skirt: maybe a little embroidery at the bottom and next time I might not do jersey.

I'm also thinking this might be a cut way to make a dress and salvage an old t-shirt or tank. Just cut off the bottom of the shirt and stitch the skirt to the shirt. Cute?

Sunday, April 11, 2010

Cherry Blossom Fake-Out

While I love all the beautiful spring blossoms, my nose feels entirely different. So, I appreciate any little way to bring spring inside that doesn't involve a lot of pollen!

There were also a lot of fallen branches in the front yard from all the snow, which were extremely unsightly, but I hadn't gotten around to cleaning them out. So, as I cleaned them up, I had a flash of inspiration!!

This project, which I modified from the current issue of Martha Stewart Living, is simple and almost methodical. The hardest part, especially for me, was cutting out all of the flowers.

I found that if I folded the paper four times, then cut, and then folded each of the petals individually that I got much crisper, cleaner looking flowers. Like this!

1. Cut two to three-inch squares from cardstock-- you can also use vellum, but I didn't have any on hand. Fold the square in half...


2. And fold in half again. Make sure to crease it well, because this will make the flowers look much better.


3. With the folded corner pointing down, cut out the petal. For this one, I used almost a heart shape to make the cherry blossom petals.


4. After unfolding your flower, simply pinch the petals in the center to create a wonderful 3-D effect. I also used a felt pen and dotted the center to give a bit more detail.

5. To attach the petals to the branches, poke through the flowers with a large needle-- or something else sharp. Then dot some craft glue-- it needs to be on the thick side-- and slide the flower down to the glue-- not too far!! Let the branches dry standing up overnight, and you're done and ready to decorate!

Saturday, April 3, 2010

{spring things}


These hair pins and ring are just a few of the new pieces I have made. I'm really loving the colors, aqua and coral, and I just wish my new haircut was cute enough for those pins.

I used EcoGlue this time because I was tired of getting headaches from the awful stench of the glue. So, I tried this one out. It worked really well, despite all the problems I had in the beginning.

This glue is water-based, so it is much thinner than the other glue. The cabochons kept sliding off of the bases on the pins.

In the end I just kind of propped them up with other objects. I'm not sure I can use it to glue earrings to posts though because it is so thin.

However, I really appreciated not suffocating or feeling like I automatically had cancer while I was gluing my pieces together!

Thursday, April 1, 2010

{posters}


I've been working on a little decoration for my theoretical craft room. I took a little inspiration from the New York Public Library's digital gallery, which I absolutely LOVE, as well as my favorite spring colors.

I also included a few of my favorite quotes-- two from Jane Austen because I'm on a bit of a kick after re-reading Emma.

I've designed the four prints shown above to hang in a square above my bookcase. I'm thinking black frames, but I'm not sure. What do you think?

Tuesday, March 30, 2010

Lunch bag No. 2


I went to the fabric store, and... I've made another lunch bag.

When I went back to the fabric store, they had a few new things in... and I fell in love with one that went perfectly with the red lining I had left over.

I was kind of miffed that they hadn't had it the time before, but I forgave them because this one flew by-- now that I know what I'm doing.

A couple things I wish I had done:
  1. sewn the hook enclosure on BEFORE sewing together the enclosure flap and
  2. checked to make sure the enclosure was REALLY straight before I started sewing. It's not that it looks terrible, but I know it's crooked, so it is bugging me.


Note: the beautiful orchid that Mr. Cupcake gave me for Valentine's!

Saturday, March 27, 2010

{busy, busy}


I've been running all day! But it feels good to have accomplished so much. I finally got around to taking pictures of a few projects-- thank you weather, so expect some new posts soon.

And I made Easter eggs! I tried to use the techniques from the most recent Martha Stewart Living, but it didn't work out quite right... Oh well.

I also made an apple pie-- well... am making. It's in the oven right now, and I'm not sure how it's going to turn out. I kinda ran out of crust, and I didn't feel confident enough to try to expand it on my own. I guess I'll have to wait and see. All that matters is how it tastes!!

The cards pictured at the top were also part of this morning's endeavors. These Easter-- well, more like spring-- cards are just a few hand-cut pieces glued to a Liberty of London card from Target.

I hand drew the flowers, trying to match them to flowers on the cards. Then I cut around the drawings with a craft knife.

I could have saved myself some time and just used a printed drawing, glued to the back and then cut around.

I'm working on a few cards now with bird's nests and eggs. They are pretty cute!

Sunday, March 21, 2010

Lunch, anyone?


In one good afternoon, I can do a lot more than in several nights. I had been working on this one in pieces-- cut it out one night, sew a bit another night, iron and topstitch another-- but the other afternoon I had a bit of time off, and I just sat down and did it!

In all actuality, I probably hadn't done much more than on any of the other occasions, but finishing a project just makes me feel as though I've DONE something. And it's a good feeling.

This project was easy-peasy, once I understood the directions. I had been putting it off for a long time, but after a week of grocery bag lunches, I knew I need something more stylish.

This tutorial-- which I got from the Sewing:2010 Day-to-Day Calendar-- came from the wonderful Melissa Esplin at ISLY.

I had a little trouble following some of the tutorial's directions, but everything is simple enough to figure out. One thing I would do, is sew on the hook side of the hook-and-loop closure before sewing together the enclosure pieces.I also used oil cloth for the lining instead of regular cotton; it keeps things clean and was pretty easy to sew!

Also... I'm still not sure how to do the sew together and turn inside out part. I just folded the edges down and then topstitched!

I'm really loving the design though. And the wristlet is great for keeping free hands!

Thursday, March 18, 2010

I just can't help myself...

Design*Sponge


I HAD to share this lovely post from Design*Sponge.

I'm so enthralled with this idea. The purpose is to display your "stock" so you know what you have and don't have to hunt around, or buy extras. But I think it's just a lovely way to liven up a craft room.

And I'm a total fabric hoadrer. I picked it up from my grandmother, who had boxes upon boxes of fabric stored away. I just don't want to throw away-- or use up!!!-- anything so gorgeous as my materials!

Perhaps with these I can just keep a small piece of each, display it, and use the rest. Do you think it's possible?

Monday, March 15, 2010

word of the week: nifty


So... I was blogging yesterday, and the site had a spaz on me, and then... CRASH!! All of yesterday's post went missing in one fell swoop.

After a small fit of rage, I decided to quit, but here I am again to recreate what was lost.

Recovering from a lazy weekend-- and the time change-- is making me a little bleh. So, I've been flipping through my google reader in hope of finding a few things to perk me up. Nearly 700 items!! I didn't know I had been MIA for so long. The weather is again crap, but I found a few nifty things to brighten my-- and your-- day.

Pictured above is a project I'd love to do from Design*Sponge. And I'm loving this three-tiered serving tray video tutorial from Decorityourself.

The wonderful LollyChops is also hosting a craft-a-long week next week and has posted the materials for everyone to get started collecting. I'm super curious to see what she'll be doing!

Tuesday, March 9, 2010

{thrifted, found and made}


This is going to be a pretty big post to make up for my recent absence. Hopefully, I can get back into a routine soon, but don't fear: the crafting never stops.

I went thrifting today, which was fun for me. I'm using my purchases to display a few new things that I've made. The cake stand is something that I've had for a while, but I bought the bottle this morning and found the mini stand plate in my grandmother's attic.

The rosettes-- oh, how many I've made!-- are a newer, better, I think, version of my older ones. I think the beading is a lot more delicate than the vintage buttons, and, of course, I love the coral.

I wore one to my mother's birthday party this weekend, and I got a lot of compliments-- and it perfectly matched my sweater!

I'm thinking of pulling a page from doe-c-doe's blog and using pin backs to make it into a necklace-- and also a pin! I love things that can work two ways. It's so convenient.

P.S. exciting!!-- let me know what you think of the card designs! I've gotten an Etsy shop, but just haven't set it up. I'm thinking that will be my logo-- and name.

Thursday, February 25, 2010

Thursday Blues

I'm been a bit down this week. Not sick, or depressed, just tired. Worn down. I'm ready for some much needed sunshine and nice weather. But to cheer me-- and you too, hopefully-- here is a little link love. Ideas for the weekend, perhaps?

Thursday, February 11, 2010

Down-to-the-wire valentines


Here's a little link love to beat the Valentine's Day rush.

I did pretty good about getting my valentines out early this year, but it's a miracle. I mailed them yesterday, and I'm praying the arrive in a nice condition!!

I do wish I had seen some of these lovely projects before I had finished!

Printables
Gifts
Handmade
Sweet Treats
  • edible cupcake stands from Giver's Log
  • heart toothpick cupcake decorations on My Crafty Mess
  • chocolate strawberry ice cream sandwiches--I can die happy-- on mint

Sunday, February 7, 2010

handmade valentines to bring a smile


I think making valentines is one of my favorite parts of Valentine's Day. I've made my own cards for a few years now, and I love them more each year.

This year, I took a little inspiration from avie designs. I also got a little stamp-happy with my new stamp set, thank you Mr. Cupcake!

I had all my stuff spread out Friday and Saturday, paper scattered every where, and glue on everything. I used bits and pieces I had let over from the Christmas tree decorations. It was fun and childish, and it just makes me happy. And giving a homemade valentine makes others happy too.

I'm mailing a few out this year, and I'm going to hate putting them in the mail, but I'm hoping those hearts will pop back to life when the card comes out of the envelope!

Saturday, February 6, 2010

Earring necklace from doe-c-doe

I thought this adorable and thrifty idea was too good to pass up on the reposting of this adorable redesign from doe-c-doe.

I really wish I had one of those power tools--wouldn't that be dangerous though! It would have been very helpful when I repurposed my great-grandmother's pin into a necklace.