Showing posts with label fabric. Show all posts

Wednesday, June 2, 2010

{skirt No. 2}

I sat down on Memorial Day, and I finally made it.

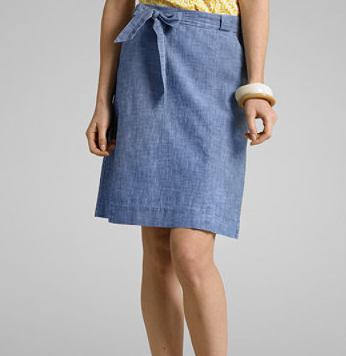
I've been planning to and dreaming about recreating this L.L. Bean Signature Collection skirt since I saw it in their summer catalog a few weeks ago.

In between the family visit, burgers and homemade ice cream, I slowly pieced together and hemmed the fabric. And in a second wind around 10 p.m., I put in the zipper and pieced together the tie belt from the pieces left.

I used a linen blend-- hence the wrinkles; I didn't bother ironing-- instead of chambray. I also nixed the belt loops and made the waist band and belt wider

I used the "Bias Skirt" pattern from One-Yard Wonders, which I could not love more, with same waistband technique that I used last time. However, to be fair, this project did take almost an entire yard and a quarter, as well as a zipper that the pattern did not include.

I wore the skirt to work and then to a party yesterday, and I loved it. It held up beautifully, and I felt proud to have made this!

Thursday, April 15, 2010

{breezy}

Okay... Not the most flattering picture, but the skirt is so comfy! I made this easy, jersey skirt in under an hour the other day.

I had just gotten One Yard Wonders after failing to make a jersey skirt without a pattern. I suddenly wished I had had the book just a day earlier, because it would have saved a lot of math and seam ripping.

The skirt pattern and instructions are really simple and straight-forward. I also used a trick that I learned from my mother to make the waistband, without a seam showing!

It goes a little like this:

  1. Cut two waistband pieces the same length as the width of your skirt and double the measurement you want the waistband to be finished.
  2. Fold the waistband piece in half lengthwise with right sides together. Tuck one of the pieces of your skirt in between the edges of the waistband. Line the edges of the waistband with the top edge of the skirt. Pin.
  3. Sew.
  4. Pull the skirt piece out of the little roll, and this will automatically turn the waistband right side out-- like magic!
  5. Do the same to the other piece, then sew both sides of the skirt together!

*If that didn't make much sense to you, this tutorial might be helpful!

I'm already planning two improvements to this skirt: maybe a little embroidery at the bottom and next time I might not do jersey.

I'm also thinking this might be a cut way to make a dress and salvage an old t-shirt or tank. Just cut off the bottom of the shirt and stitch the skirt to the shirt. Cute?

Tuesday, March 30, 2010

Lunch bag No. 2


I went to the fabric store, and... I've made another lunch bag.

When I went back to the fabric store, they had a few new things in... and I fell in love with one that went perfectly with the red lining I had left over.

I was kind of miffed that they hadn't had it the time before, but I forgave them because this one flew by-- now that I know what I'm doing.

A couple things I wish I had done:
  1. sewn the hook enclosure on BEFORE sewing together the enclosure flap and
  2. checked to make sure the enclosure was REALLY straight before I started sewing. It's not that it looks terrible, but I know it's crooked, so it is bugging me.


Note: the beautiful orchid that Mr. Cupcake gave me for Valentine's!

Monday, February 1, 2010

Finished!


The snow has helped me out! I finally finished the project I have been working on... a sketchpad strap.

Instead of carrying a large portfolio for my sketchbooks, I decided to make this carrier, which is much less cumbersome, especially for someone a short as I am! I made up the pattern to be specified to my notebooks, but I'm working on a tutorial that can be adjusted to any size.

I'm really liking the way this looks, especially the retro-ish fabric, which, by the way, was a trip to sew. I'm thinking that I might add buttons over the velcro just for a little extra pop!

Thursday, January 21, 2010

Rosette Tutorial


Here's the rosette tutorial as promised! It's a pretty simple thing, but I thought I'd go ahead and explain it anyway. Bear with me, please. This is probably going to be a long one, but I hope you can put it to use!

1 Begin with a long piece of felt. I used about 1 inch by 6 inches. Remember that the width of the piece will be doubled in the end, so this should make a 2 inch rosette. You can of course go larger and smaller, and this will allow for stacking!

2 Stitch along one long side using a basic running stitch. You don't need to tie off the ends, but leave about two inches of tail at the start. You'll need it later! Small stitches will result in a more ruffled rosette, while long stitches will produce a less pronounced ruffle.

3 Pull the end of the thread while holding the start tail until the ends of the felt meet and over lap. The ends may not ruffle as well, but don't worry!

4 Using the long end tail, sew the two short sides together, again with a running stitch. I went to the top and back down, just to make it more secure. Try to avoid sewing through the short tail, so that you can use it to make a tighter ruffle later.

5 To finish, pull both tails tight until the center is closed or nearly closed. Tie off with a knot, clip the ends, and you're done!

Variations: You can also use the technique with frayed or pinked fabric-- like this, or double the fabric over and sew the edges together to form the basting stitch. Remember to use a longer length with fabric, as it is not as thick as felt.

Sunday, January 17, 2010

Productivity visits here

Infrequently, I can be very productive. This lazy, long weekend has actually turned out to be very productive. I didn't realize how much I had done until I finished.

I thrifted and refurbished this vintage plastic frame, turning it into a jewelry cork board.


I also gave this cutie a bath, and now he is fresh and lovely. Too bad it's raining, and he won't stay that way.


And while I was watching a rerun of the World's Strongest Man Contest-- wicked!!-- I started on this. It's sad that I can't finished it, as I have no sand! However, I should still be able to post pictures and a tutorial for this pin cushion/trash bag soon! Until then, stay productive!! It really does feel good...

Monday, January 11, 2010

Tea inspired napkins

A friend of mine is a great tea aficionado, which she's been striving to turn me into for years. Her love of tea, along with this download from A Print a Day, inspired her Christmas gift, a set of embroidered napkins to go along with her tea.

I drew my cups instead of using the template, so that I could personalize them. I tried to make each one unique and specific to a time period.

I started by drawing the designs onto the napkins. I measured to make sure they were in approximately the same spot--I'm bad at guessing distances. I drew mine in with pencil, but that probably wasn't the best idea on my part. A washable fabric pen probably would have smudged less.

After I embroidered each cup, I washed the napkins, ironed them, and folded them into the gift box.

I'm guessing that she liked them, because the day after I gave them to her, they were already on her dining room table! I wish I could have found such perfect and thoughtfully handmade gifts for everyone, but perhaps if I start early this year, I can make the next year a handmade Christmas!

P.S. Other cute ideas for embroidered napkins could be birds or trees--especially at Christmas--mixers, cakes, or other kitchen paraphernalia. Check out this sweet free downloadable from LollyChops for more ideas!

P.P.S. Here are just a few sites to check out-- along with Flickr-- for some great embroidery ideas and patterns.

Tuesday, December 15, 2009

Ten and Counting...


With only ten days until Christmas-- Yay!!-- I thought I'd go ahead a share these before time runs out! I made these Christmas stockings a while back, but it's been so busy lately, that I hadn't gotten a chance to take photos.

The story is... I absolutely fell in love with a stocking set and tree skirt at Pier1, and since it was pretty simple materials, just felt, I thought, "why couldn't I make that?" So, I did!!

1 I drew up my pattern for the stocking and appliques-- I had to simplify a lot from what I had originally planned, but I think it looks better that way.

2 I cut out the pieces from felt and fleece, and the stocking are actually made from fleece, and glued them to the surface to keep them in place as I stitched the edges.

3 I stitched around the edge of the stocking, making sure to leave a half an inch edge. Then I scalloped the edges, just with my scissors, for a cute finishing touch!

4 The cuffs were just two rectangles the width of the top edge. I stitched the trim on first, then stitched them together, and stitched them on to the top, where I added a loop of ribbon at the side seam opposite the toe.

Sadly, the accompanying tree skirt that I had planned to make will not be joining us this Christmas. All that hand-stitching takes time.

I had also planned to put up a template of the design with this post, but it's not here. It'll be up sometime though!!

Wednesday, December 9, 2009

Deck the Halls

[left to right, top to bottom]
1Design*Sponge 2Scissor Variations 3Scissor Variations 4Thompson Family Life

I've definitely been in the decorating mood. Not only have I made three adorable paper trees, but I've also got my tree up and decorated, and I made a wreath for the front door! I feel very on top of everything, which probably won't last very long.

But since I have a bit of free time, I did some searching. And I found some beautiful holiday decorations!! But I don't have enough energy to do all mine over again... So, this is for you:

Thursday, November 12, 2009

Retro Patterns???


I have just died and gone to heaven again. I didn't notice when pattern makers began republishing old patterns, but I have to thank them.

I went into my local crafting store to look for the pattern for a pencil skirt, and I found way more than I wanted to, as is my habit! But how could I resist retro patterns?? Plus, this pattern worked much better for my purpose than did any of the others that I saw; although, I think I am going to modify it by adding some kangaroo pockets in the front...

I think the sizing is a bit different in older patterns. Has anyone noticed this? I am having to make a size 12, where I am usually an 8...

Alas, I have so many projects and so little time, that I'm not sure when I will get this fabulous skirt done...

Thursday, November 5, 2009

Tee 'Em, Boys

I saw this wonderful T-shirt tutorial on Etsy's Storque. It's super cute and definitely a good way to recycle old tees.

And this made me wonder about other ways to recycle old shirts. So, I did a little research.

Or, if you'd like to buy upcycled fashions, check out some of these Etsy sellers:

1Peeko Apparel 2all the numbers 3wonderwear 4Peeko Apparel

Wednesday, October 28, 2009

Softies for Mirabel


While reading my RSS feed, I came across this post on Meet Me at Mike's.

Softies for Mirabel is an event for an Australian charity, The Mirabel Foundation. The Foundation supports children orphaned and abandoned due to parental drug use. The softies made will be matched up with each child.

Submissions for Softies for Mirabel must be sent in by December 10, so if you wish to participate, now is the time to start!

For the address and more information and regulations, click here.

And here's a list for some awesome softie ideas!And if you do make a softie, post a link or a picture and let me know!!

Monday, October 26, 2009

OH MY LORD! It's the end of the world as I know it...


It's FINALLY here!! The first of the Penguin Classics clothbound series come out in the US tomorrow--at least according to Amazon. These books are beautiful and classic and WOW!!

I first saw these books on Design*Sponge. Some still aren't available in the US, but my favorite book, Pride &Prejudice--cliche, I know-- is available! I can't wait to get these tomorrow!!

Friday, October 16, 2009

Weekend Project Idea:Ruffled Headband

Okay... I have to admit, I've tried this one before, and it just didn't work out quite right. I wasn't happy with the results, and I'm determined to get it right. So, my mission this weekend is to try again and see what I can come up with.

Some other good weekend project ideas:

Tuesday, October 6, 2009

Covered cork board jewelry frame

I did it! Okay... I half did it. I actually had two picture frames that I wanted to finish, but the second has staple problems. The first had its problems too, but I overcame, and the finished product is pretty nice!!

I started out with a slide-in picture frame that's back was completely grimey. But take a picture frame and patch your pieces of cork board to fit the frame. So, I replaced the back of the frame, with just a cardboard folder and glued the cork down to that.

Next, simply cut your fabric a couple of inches around the board. --I chose a jersey knit so that it would stretch around the board.-- Peel up the cardboard from the back of the cork and stretched the fabric around. Tuck it in between the cork and the cardboard, then press the cardboard firmly back in place.

After it's glued, let it dry!! I probably didn't let mine dry long enough, but it's working pretty well.

The last step? Just slip it into your picture frame and voila!! A beautiful and functional jewelry frame. Just pin your jewelry on the frame, and let it decorate your space as a multi-functional piece of art!

Friday, October 2, 2009

Weekend project idea: Jewelry Display

This weekend I'm hoping to finish some boards on which to display my jewelry. Hopefully, they'll be as beautiful as this one from Craftynest.

I've already found a few unused picture frames from my grandmother's attic, and I have fabric and paint in mind. So it's coming along swimmingly, and I'm hoping this weekend will be a nice one to do some painting!

So, check back Monday for a hopefully complete and completely beautiful project!


For a few more wonderful jewelry display ideas, check out these wonderful links:

Sunday, July 26, 2009

Little Swiss Girl

I made this doll as a belated birthday present for a very sweet little girl in my neighborhood. I put a lot of work into it, and although it isn't perfect, I'm proud of this first attempt. The pattern came from Stitched in Time, the book from the lovely writer of Posie Gets Cozy.

I, of course, made things a bit harder for myself and altered the pattern from the directions. Instead of gathering the ends of the arms and legs with a whip stitch, I sewed them closed on the machine, to make them more sturdy for a small girl. The effect is not as smooth-- the feet and hands are a bit square-- so perhaps I should have rounded the ends as I sewed.

The pattern also called for the skirt to be gathered and sewn to the doll, with the ribbon added simply as decoration. I made the skirt interchangeable by making a casing for the drawstring and bringing the ribbon through two buttonholes in the front.

I also felt that the pattern directions were not as clear when it came to adding the hair, but I did my best. In retrospect, I should have almost overstuffed the head, or added the hair before I had sewn on the legs, so I could have added more filling.

However, the expression on the little girl's face when she saw her doll was enough to erase any fears about its appearance.

Wednesday, July 8, 2009

Birthday Quilt

This quilt, from my mother on my 20th birthday, has been in the works for years. This quilt is called "Turning Twenty," and uses twenty fat quarters. It's easy to cut out and piece together, and it is finally done-- almost... I have always loved these reproduction vintage fabrics, and this quilt, although a bit crazy-colorful, is pure happiness for me. The colors and prints just lift me up, and although they don't necessarily match, I think that it's the spirit that counts.

Thursday, July 2, 2009

Sunday Afternoon Laptop Sleeve

A Sunday afternoon all to myself, and what to do? Make a laptop sleeve of course!! This excellent pattern came in the form of a free PDF download from Sew, Mama, Sew! The pattern is customizable to any laptop, which is really helpful as I have an older MacBook.

I think my case turned out beautifully, and I made in the span of one Sunday afternoon. I do love the accomplishment of a project that can be finished in one setting, made and enjoyed in one day!

I did have a few problems in making this case, but in the end, it was my own fault. I bought a double-sided fusible quilting batting, instead of the fusible fleece called for in the pattern. I thought this would eliminate a few steps, but in the end, it took longer because it would NOT stick.

I also added some double fold bias tape to the front flap to break up the small argyle pattern. This just added an extra step and a lot of careful sewing to the project. I had done bias tape before on a skirt, and it turned out really great.

However, sewing is not like riding a bike. I hadn't sewn for a while before this project, and while I thought I would still be able to sew just as well, I was mistaken. I ended up sewing the bias tape on at least twice.

The end project, however, is beautiful and fits my laptop like a glove, unlike the one I bought before! So, thank you, Sew, Mama, Sew! for the free PDF pattern!

Saturday, June 27, 2009

First attempt: Ruffled headband

Hello dear readers! I know I have been absent for a while, and it is not that I haven't been crafting. I have a few things under my belt to show you, but the weather has been so temperamental as to make taking pictures quite a chore.

However, the weather and my schedule have finally coordinated as to allow me to take pictures! So here was my first craft for the week: a ruffled headband.

I found the tutorial for this cute headband on the wonderful Heart of Light. I decided to alter it a bit and not have the ruffles cover so much of my head, as my hair is rather flat and not as cute as the hair in the tutorial, and I thought it would look strange.

I also used a wider ribbon that I had lying around-- another bad idea for my hair. I love the color of the ribbon, but the width did not work with my head.

Instead of simply letting the ribbon tie around my head, I added a piece of elastic to make a stretchable headband. To do this, I just folded the edges of the ribbon around into a cone shape--after applying some fray check-- and inserted the end of the elastic into the whole, then sewed the elastic into the ribbon.

I like the idea of tapering down toward the elastic, as it would decrease the amount of width behind the ears-- which can cause funny hair poufs in the back.

I do think the finished project turned out beautiful, but not beautiful for me. The wider ribbon would probably work better for a person with more volume in their hair.

Next time, I will definitely follow the directions--instead of going for convenience-- and use a smaller ribbon! I do definitely recommend this project, and you can check it out at Heart of Light.