Showing posts with label sewing. Show all posts

Wednesday, June 2, 2010

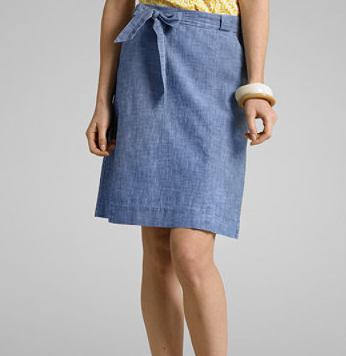
{skirt No. 2}

I sat down on Memorial Day, and I finally made it.

I've been planning to and dreaming about recreating this L.L. Bean Signature Collection skirt since I saw it in their summer catalog a few weeks ago.

In between the family visit, burgers and homemade ice cream, I slowly pieced together and hemmed the fabric. And in a second wind around 10 p.m., I put in the zipper and pieced together the tie belt from the pieces left.

I used a linen blend-- hence the wrinkles; I didn't bother ironing-- instead of chambray. I also nixed the belt loops and made the waist band and belt wider

I used the "Bias Skirt" pattern from One-Yard Wonders, which I could not love more, with same waistband technique that I used last time. However, to be fair, this project did take almost an entire yard and a quarter, as well as a zipper that the pattern did not include.

I wore the skirt to work and then to a party yesterday, and I loved it. It held up beautifully, and I felt proud to have made this!

Thursday, May 13, 2010

{rosette pin tutorial--as promised!}


Buried in a drawer-- that's where I found the battery charger. In fact, the same, exact drawer in which I keep my camera!! Don't I feel just DUMB.

So finally, here is the tutorial-- a bit too late for Mother's Day, but perhaps it can go to good use another special occasion?

So, what you need for this project is:

  • a few rosettes in your-- or their-- favorite colors, you can use this tutorial
  • needle and thread
  • an extra strip of felt
  • a pin back
  • beads-- or buttons or anything else you like-- for the centers

1. Sew the rosettes to the extra piece of felt. To sew without the thread showing, just insert the threads in between the ruffles. It's also cute to let them show, especially if you use a contrasting color or one that matches your beads/buttons.

I like to overlap and curve mine, but they're also adorable to stack, and be sure to play around before you sew!

2. Cut the backing felt so that it doesn't show from the front. There's no need to finish the edges, but if you're especially hard on your jewelry, you might want to invest in a little fray check.

3. Use the same method used to attach the rosettes to add the beads (or just sew on the button).

4. Attach the pin back to the backing felt, and voila! Easy peasy. I went through each of the holes several times to make it super secure and then tied the ends behind the pin back. It's easy to miss the felt, so make sure you're getting the felt in your stitches each time. I would also suggest gluing down the thread tails to avoid them sticking out.

This is one easy project with beautiful end results. I spend about an hour total on each, so one TV program, and I'm done! I hope all of you will enjoy these as much as I have!

Wednesday, May 5, 2010

{mother's day surprise}


Well... it's more just like a card and a present rolled into one! But I think all my mothers and grandmothers are going to love one.

I suppose the postage would be a bit more on this than a regular card-- I'm handing them out to my family-- but aren't our mothers worth it?

I designed the card fronts specifically for this purpose, to put a pin next to it. Then I made another version for sending without the pin.

Hopefully, my mother's will wear the pins with pride-- and sorry for ruining your surprise-- or at least enjoy looking at the lovely cards!

** I'm putting the card fronts below. I hoping they are large enough and of good enough quality for you guys to use. I recommend printing them two to a page that is printed landscape.

Feel free to print them out and send them for personal use, but not for personal gain! Also, link love is greatly appreciated!**

card for pin

card without pin

P.S. Watch for a tutorial coming soon!

Monday, May 3, 2010

{pretties}

Finished!! I've been tinkering with idea in my brain for literally months, and I finally got around to doing it. Not that it was hard to do (I'm sure you'll figure out what I've done in nanoseconds), I just needed the time.

I guess you could say I'm pretty into pieces that are multifunctional, and this one fits that rule. It's both a brooch and a necklace!

The chain is detachable, so that it can be worn as a brooch. And of course, I'm able to switch out different brooches so that I can switch up the colors.

I'm already thinking of other applications for this chain. Maybe some ribbon or fabric?

P.S. Also, I was trying to model the necklace, but in every picture I ended up looking giraffe-y; so I've done the best I could with the most normal, non-giraffe-y photo.

Thursday, April 15, 2010

{breezy}

Okay... Not the most flattering picture, but the skirt is so comfy! I made this easy, jersey skirt in under an hour the other day.

I had just gotten One Yard Wonders after failing to make a jersey skirt without a pattern. I suddenly wished I had had the book just a day earlier, because it would have saved a lot of math and seam ripping.

The skirt pattern and instructions are really simple and straight-forward. I also used a trick that I learned from my mother to make the waistband, without a seam showing!

It goes a little like this:

  1. Cut two waistband pieces the same length as the width of your skirt and double the measurement you want the waistband to be finished.
  2. Fold the waistband piece in half lengthwise with right sides together. Tuck one of the pieces of your skirt in between the edges of the waistband. Line the edges of the waistband with the top edge of the skirt. Pin.
  3. Sew.
  4. Pull the skirt piece out of the little roll, and this will automatically turn the waistband right side out-- like magic!
  5. Do the same to the other piece, then sew both sides of the skirt together!

*If that didn't make much sense to you, this tutorial might be helpful!

I'm already planning two improvements to this skirt: maybe a little embroidery at the bottom and next time I might not do jersey.

I'm also thinking this might be a cut way to make a dress and salvage an old t-shirt or tank. Just cut off the bottom of the shirt and stitch the skirt to the shirt. Cute?

Tuesday, March 30, 2010

Lunch bag No. 2


I went to the fabric store, and... I've made another lunch bag.

When I went back to the fabric store, they had a few new things in... and I fell in love with one that went perfectly with the red lining I had left over.

I was kind of miffed that they hadn't had it the time before, but I forgave them because this one flew by-- now that I know what I'm doing.

A couple things I wish I had done:
  1. sewn the hook enclosure on BEFORE sewing together the enclosure flap and
  2. checked to make sure the enclosure was REALLY straight before I started sewing. It's not that it looks terrible, but I know it's crooked, so it is bugging me.


Note: the beautiful orchid that Mr. Cupcake gave me for Valentine's!

Sunday, March 21, 2010

Lunch, anyone?


In one good afternoon, I can do a lot more than in several nights. I had been working on this one in pieces-- cut it out one night, sew a bit another night, iron and topstitch another-- but the other afternoon I had a bit of time off, and I just sat down and did it!

In all actuality, I probably hadn't done much more than on any of the other occasions, but finishing a project just makes me feel as though I've DONE something. And it's a good feeling.

This project was easy-peasy, once I understood the directions. I had been putting it off for a long time, but after a week of grocery bag lunches, I knew I need something more stylish.

This tutorial-- which I got from the Sewing:2010 Day-to-Day Calendar-- came from the wonderful Melissa Esplin at ISLY.

I had a little trouble following some of the tutorial's directions, but everything is simple enough to figure out. One thing I would do, is sew on the hook side of the hook-and-loop closure before sewing together the enclosure pieces.I also used oil cloth for the lining instead of regular cotton; it keeps things clean and was pretty easy to sew!

Also... I'm still not sure how to do the sew together and turn inside out part. I just folded the edges down and then topstitched!

I'm really loving the design though. And the wristlet is great for keeping free hands!

Tuesday, March 9, 2010

{thrifted, found and made}


This is going to be a pretty big post to make up for my recent absence. Hopefully, I can get back into a routine soon, but don't fear: the crafting never stops.

I went thrifting today, which was fun for me. I'm using my purchases to display a few new things that I've made. The cake stand is something that I've had for a while, but I bought the bottle this morning and found the mini stand plate in my grandmother's attic.

The rosettes-- oh, how many I've made!-- are a newer, better, I think, version of my older ones. I think the beading is a lot more delicate than the vintage buttons, and, of course, I love the coral.

I wore one to my mother's birthday party this weekend, and I got a lot of compliments-- and it perfectly matched my sweater!

I'm thinking of pulling a page from doe-c-doe's blog and using pin backs to make it into a necklace-- and also a pin! I love things that can work two ways. It's so convenient.

P.S. exciting!!-- let me know what you think of the card designs! I've gotten an Etsy shop, but just haven't set it up. I'm thinking that will be my logo-- and name.

Thursday, February 4, 2010

Organization


It eludes me, but I love it none the less... I think I like the idea of organization more than the practice, but don't we all.

I especially love the idea of buying all the organizing accessories, like this. But alas, I will probably never have that much money.

I am getting started on a small crafting space in my apartment though! Yipee!! All I have right now is a bookcase, but I'll progress eventually.

I'm actually pretty proud of this bookcase. It's not the best-- just a cheapie from Target-- but I put it together, with the help of Mr. Cupcake, and I got to use a power drill. I only stripped two screws, and I didn't hit my thumb with the hammer once!

I have all my crating books together on the shelf, cupcake liners in one jar and cookie cutters in another--although it is a little small for all of them. And I'm using the cloth bins to store my fabric, scraps in one, and fat quarters and half-yards in another.

Now there is the problem of what to do with the rest of my stuff because that wasn't even half of it. Right now, a fair amount of my fabric is in a cardboard box. I also have various boxes of paper and felt and other what-nots, and I'm not sure what to put them in.

Please let me know of any good organizing tips, and I'll be sure to share with you as well!

Monday, February 1, 2010

Finished!


The snow has helped me out! I finally finished the project I have been working on... a sketchpad strap.

Instead of carrying a large portfolio for my sketchbooks, I decided to make this carrier, which is much less cumbersome, especially for someone a short as I am! I made up the pattern to be specified to my notebooks, but I'm working on a tutorial that can be adjusted to any size.

I'm really liking the way this looks, especially the retro-ish fabric, which, by the way, was a trip to sew. I'm thinking that I might add buttons over the velcro just for a little extra pop!

Saturday, January 23, 2010

Christmas presents!


Yes, I am finally getting around to looking through the books I got for Christmas. Or, more like, I just got around to taking pictures of them!

I'm yearning to sit down and start on these projects; so perhaps sometime this week I'll be able to share.

But for right now, I'm still hard at work making jewelry. I finally got the posts to glue to the earrings. Success!!

Thursday, January 21, 2010

Rosette Tutorial


Here's the rosette tutorial as promised! It's a pretty simple thing, but I thought I'd go ahead and explain it anyway. Bear with me, please. This is probably going to be a long one, but I hope you can put it to use!

1 Begin with a long piece of felt. I used about 1 inch by 6 inches. Remember that the width of the piece will be doubled in the end, so this should make a 2 inch rosette. You can of course go larger and smaller, and this will allow for stacking!

2 Stitch along one long side using a basic running stitch. You don't need to tie off the ends, but leave about two inches of tail at the start. You'll need it later! Small stitches will result in a more ruffled rosette, while long stitches will produce a less pronounced ruffle.

3 Pull the end of the thread while holding the start tail until the ends of the felt meet and over lap. The ends may not ruffle as well, but don't worry!

4 Using the long end tail, sew the two short sides together, again with a running stitch. I went to the top and back down, just to make it more secure. Try to avoid sewing through the short tail, so that you can use it to make a tighter ruffle later.

5 To finish, pull both tails tight until the center is closed or nearly closed. Tie off with a knot, clip the ends, and you're done!

Variations: You can also use the technique with frayed or pinked fabric-- like this, or double the fabric over and sew the edges together to form the basting stitch. Remember to use a longer length with fabric, as it is not as thick as felt.

Sunday, January 17, 2010

Productivity visits here

Infrequently, I can be very productive. This lazy, long weekend has actually turned out to be very productive. I didn't realize how much I had done until I finished.

I thrifted and refurbished this vintage plastic frame, turning it into a jewelry cork board.


I also gave this cutie a bath, and now he is fresh and lovely. Too bad it's raining, and he won't stay that way.


And while I was watching a rerun of the World's Strongest Man Contest-- wicked!!-- I started on this. It's sad that I can't finished it, as I have no sand! However, I should still be able to post pictures and a tutorial for this pin cushion/trash bag soon! Until then, stay productive!! It really does feel good...

Thursday, January 14, 2010

Rosette Rage

I've been in a rosette frenzy of late. I've done this before, but never in this quantity. I just kept making them.

It was really to have something to do with my hands. I cut strips of different colors, lengths and widths, and then I gathered, and gathered, and tied. And I really had no idea what to do with them at first.

But then, it just appeared, in a burst of inspiration. I don't know why, but the more I do, creatively, the easier it comes. I think it's that way for a lot of people, and this is why I am striving to never go a day without doing something creative, stretching my creative muscle, I guess.

And like stretching real muscles, I am hoping that my creativity will expand, become more flexible.

And the burst of creativity said to me last night, why not make a necklace out of these... So I am going to try!

P.S.I'll try to post a tutorial for this soon. I tried finding a similar one online, but no luck. Stay tuned!

Tuesday, December 15, 2009

Ten and Counting...


With only ten days until Christmas-- Yay!!-- I thought I'd go ahead a share these before time runs out! I made these Christmas stockings a while back, but it's been so busy lately, that I hadn't gotten a chance to take photos.

The story is... I absolutely fell in love with a stocking set and tree skirt at Pier1, and since it was pretty simple materials, just felt, I thought, "why couldn't I make that?" So, I did!!

1 I drew up my pattern for the stocking and appliques-- I had to simplify a lot from what I had originally planned, but I think it looks better that way.

2 I cut out the pieces from felt and fleece, and the stocking are actually made from fleece, and glued them to the surface to keep them in place as I stitched the edges.

3 I stitched around the edge of the stocking, making sure to leave a half an inch edge. Then I scalloped the edges, just with my scissors, for a cute finishing touch!

4 The cuffs were just two rectangles the width of the top edge. I stitched the trim on first, then stitched them together, and stitched them on to the top, where I added a loop of ribbon at the side seam opposite the toe.

Sadly, the accompanying tree skirt that I had planned to make will not be joining us this Christmas. All that hand-stitching takes time.

I had also planned to put up a template of the design with this post, but it's not here. It'll be up sometime though!!

Tuesday, December 1, 2009

Christmas Ornaments Unleashed


Well... I'm starting to get into the Christmas spirit, and this is definitely my favorite time of year!! I think my Christmas spirit has increased in the last few years, especially since I've gotten my own tree to decorate!

And since it's after Thanksgiving, and I've got my tree now-- I even put lights on it tonight!!-- I'm in the mood for some ornaments!! So here are just a few fun and easy projects to get me-- and you!-- in the festive spirit!

Thursday, November 12, 2009

Retro Patterns???


I have just died and gone to heaven again. I didn't notice when pattern makers began republishing old patterns, but I have to thank them.

I went into my local crafting store to look for the pattern for a pencil skirt, and I found way more than I wanted to, as is my habit! But how could I resist retro patterns?? Plus, this pattern worked much better for my purpose than did any of the others that I saw; although, I think I am going to modify it by adding some kangaroo pockets in the front...

I think the sizing is a bit different in older patterns. Has anyone noticed this? I am having to make a size 12, where I am usually an 8...

Alas, I have so many projects and so little time, that I'm not sure when I will get this fabulous skirt done...

Thursday, November 5, 2009

Tee 'Em, Boys

I saw this wonderful T-shirt tutorial on Etsy's Storque. It's super cute and definitely a good way to recycle old tees.

And this made me wonder about other ways to recycle old shirts. So, I did a little research.

Or, if you'd like to buy upcycled fashions, check out some of these Etsy sellers:

1Peeko Apparel 2all the numbers 3wonderwear 4Peeko Apparel

Wednesday, October 28, 2009

Softies for Mirabel


While reading my RSS feed, I came across this post on Meet Me at Mike's.

Softies for Mirabel is an event for an Australian charity, The Mirabel Foundation. The Foundation supports children orphaned and abandoned due to parental drug use. The softies made will be matched up with each child.

Submissions for Softies for Mirabel must be sent in by December 10, so if you wish to participate, now is the time to start!

For the address and more information and regulations, click here.

And here's a list for some awesome softie ideas!And if you do make a softie, post a link or a picture and let me know!!

Friday, October 16, 2009

Weekend Project Idea:Ruffled Headband

Okay... I have to admit, I've tried this one before, and it just didn't work out quite right. I wasn't happy with the results, and I'm determined to get it right. So, my mission this weekend is to try again and see what I can come up with.

Some other good weekend project ideas: